thinkcmf5(tp5.0) + workman实现简单客服聊天功能

配置过程中遇到的问题及说明:

1、首先需要对长连接相关概念有一定了解。

2、通过composer默认安装的workman版本不对,报错,使用命令composer require topthink/think-worker=1.0.1

3、通过1、发现composer包列表网址,https://packagist.org,可以通过该网址查找composer包,包括说明。

4、报错:stream_socket_server() has been disabled for security reasons … ,修改php.ini,disable_functions项,去掉stream_socket_server。


安装步骤说明:

1、composer安装命令,composer包安装倒了vendor/workerman/目录中。

1
composer require topthink/think-worker=1.0.1

2、在项目根目录中新建server文件,内容如下:

1
2
3
4
5
6
7
8
9
10
11
12
13
14
15
16
17
18
19
20
21
22
23
24
25
26
#!/usr/bin/env php
<?php
// +----------------------------------------------------------------------
// | Date:2019.1.15
// +----------------------------------------------------------------------
// | Author: asher.w
// +----------------------------------------------------------------------
// 调试模式开关
define("APP_DEBUG", true);
// 定义CMF根目录,可更改此目录
define('CMF_ROOT', __DIR__ . '/');
// 定义插件目录
define('PLUGINS_PATH', __DIR__ . '/public/plugins/');
// 定义应用目录
define('APP_PATH', __DIR__ . '/app/');
// 定义CMF核心包目录
define('CMF_PATH', CMF_ROOT . 'simplewind/cmf/');
// 定义扩展目录
define('EXTEND_PATH', CMF_ROOT . 'simplewind/extend/');
define('VENDOR_PATH', CMF_ROOT . 'simplewind/vendor/');
// 定义应用的运行时目录
define('RUNTIME_PATH', CMF_ROOT . 'data/runtime/');

define('BIND_MODULE','push/Chat');
// 加载框架引导文件
require CMF_ROOT.'simplewind/thinkphp/start.php';

3、服务器端控制器代码:

1
2
3
4
5
6
7
8
9
10
11
12
13
14
15
16
17
18
19
20
21
22
23
24
25
26
27
28
29
30
31
32
33
34
35
36
37
38
39
40
41
42
43
44
45
46
47
48
49
50
51
52
53
54
55
56
57
58
59
60
61
62
63
64
65
66
67
68
69
70
71
72
73
74
75
76
77
78
79
80
81
82
83
84
85
86
87
88
89
90
91
92
93
94
95
96
97
98
99
100
101
102
103
104
105
106
107
108
109
110
111
112
113
114
115
116
117
118
119
120
121
122
123
124
125
126
127
128
129
130
<!--?php /** * Created by PhpStorm. * User: asher * Date: 2019/1/13 * Time: 15:19 */ namespace app\push\controller; use think\worker\Server; class ChatController extends Server { protected $socket = 'websocket://0.0.0.0:2346'; private $_name = []; private $_uidConnections = []; /** * 收到信息 * @param $connection * @param $data */ public function onMessage($connection, $data) { if (!$this-&gt;is_json($data)){&lt;br ?--> $connection-&gt;send('非法请求');
return;
}

$data = json_decode($data,true);

if (!isset($data['type'])){
$connection-&gt;send('非法请求');
return;
}

switch ($data['type']){
case 'private_message':

// 假设消息格式为 uid:message 时是对 uid 发送 message
$p_msg = explode(':',$data['data']['message']);

$_msg = ['name'=&gt;$this-&gt;getName($connection-&gt;id),'message'=&gt;$p_msg[1]];

$this-&gt;sendMessageByUid($p_msg[0], $this-&gt;createData('private_message',$_msg));

break;
case 'message':
foreach ( $this-&gt;worker-&gt;connections as $_connection ){
$_connection-&gt;send($this-&gt;createData('message',['name'=&gt;$this-&gt;getName($connection-&gt;id),'message'=&gt;$data['data']['message']]));
}

break;
case 'setName':
$this-&gt;setName($connection-&gt;id, $data['data']['name']);

//测试 设置id
$this-&gt;_uidConnections[$data['data']['name']] = $connection;

$connection-&gt;send($this-&gt;createData('msg',['msg'=&gt;'设置昵称为:'.$data['data']['name']]));
break;
case 'push':
if ($data['id']){
if (isset($this-&gt;worker-&gt;connections[$data['id']])){
$this-&gt;worker-&gt;connections[$data['id']]-&gt;send($this-&gt;createData('message',['name'=&gt;'后台','message'=&gt;$data['data']]));
}else{
$connection-&gt;send($this-&gt;createData('result',['msg'=&gt;'连接不存在'],1));
}

}else{
foreach ( $this-&gt;worker-&gt;connections as $_connection ){
if ($connection-&gt;id != $_connection-&gt;id)
$_connection-&gt;send($this-&gt;createData('message',['name'=&gt;'后台','message'=&gt;$data['data']]));
}
}

$connection-&gt;send($this-&gt;createData('result',['msg'=&gt;'推送成功']));
break;
}

}

// 针对uid推送数据
function sendMessageByUid($uid, $message)
{
if(isset($this-&gt;_uidConnections[$uid]))
{
$connection = $this-&gt;_uidConnections[$uid];
$connection-&gt;send($message);
}
}

/**
* 当连接建立时触发的回调函数
* @param $connection
*/

public function onConnect($connection)
{
//设置默认昵称
$this-&gt;setName($connection-&gt;id,'匿名'.rand(1000,9999));
}

/**
* 当连接断开时触发的回调函数
* @param $connection
*/

public function onClose($connection)
{
unset($this-&gt;_name[$connection-&gt;id]);
}

/**
* 当客户端的连接上发生错误时触发
* @param $connection
* @param $code
* @param $msg
*/

public function onError($connection, $code, $msg)
{
echo "error $code $msg\n";
}

/**
* 每个进程启动
* @param $worker
*/

public function onWorkerStart($worker)
{

}

private function createData($type,$data,$code=0){
$_data = [
'code' =&gt; $code,
'type' =&gt; $type,
'data' =&gt; $data
];
return json_encode($_data);
}

private function setName($id,$name){
$this-&gt;_name[$id] = $name;
}

private function getName($id){
return $this-&gt;_name[$id];
}

private function is_json($str)
{
json_decode($str);
return(json_last_error() == JSON_ERROR_NONE) &amp;&amp; !is_numeric($str) ;
}

}

4、linux进入项目根目录,启用服务监听端口。

1
php server start
1
2
3
4
5
6
7
8
Workerman[server] start in DEBUG mode
------------------------------------------- WORKERMAN --------------------------------------------
Workerman version:3.5.17 PHP version:5.6.36
-------------------------------------------- WORKERS ---------------------------------------------
proto user worker listen processes status
tcp root none websocket://0.0.0.0:2346 1 [OK]
--------------------------------------------------------------------------------------------------
Press Ctrl+C to stop. Start success.

5、前端页面

1
2
3
4
5
6
7
8
9
10
11
12
13
14
15
16
17
18
19
20
21
22
23
24
25
26
27
28
29
30
31
32
33
34
35
36
37
38
39
40
41
42
43
44
45
46
47
48
49
50
51
52
53
54
55
56
57
58
59
60
61
62
63
64
65
66
67
68
69
70
71
72
73
74
75
76
77
78
79
80
81
82
83
84
85
86
87
88
89
90
91
92
93
94
95
96
97
98
99
100
101
102
103
104
105
106
107
108
109
110
111
112
113
<style>
        .content{<br />            width: 700px;<br />            margin: auto;<br />        }<br />        .box{<br />            padding-bottom: 3px;<br />            padding-top: 3px;<br />        }<br />        .box input{<br />            width: 70%;<br />        }<br />        .box button{<br />            width: 25%;<br />        }<br />    </style>

&nbsp;
<h3>CHAT TEST</h3>

<hr />

<div class="content">
<div class="box"><input name="name" type="text" />
<button id="setName">设置昵称</button></div>
<div class="box"><input name="message" type="text" />
<button id="send">发送</button></div>
<div id="content" class="box"></div>
</div>
<script>
    var ws;
    var connected = false;

    $(function () {

        ws = new WebSocket("ws://local.hillmatrix.com:2346");
        ws.onopen = function() {
            console.log('WebSocket 连接成功');
            connected = true;
        };
        ws.onmessage = function(e) {
            // e.data
            console.log(e.data);
            try {
                var data = JSON.parse(e.data);
                //非法数据,不处理
                if (!data.hasOwnProperty("code")) return;
                if (data.code != 0){
                    if (data.hasOwnProperty("msg")){
                        alert(data.msg);
                    }
                    return
                }

                if (!data.hasOwnProperty("data") || !data.hasOwnProperty("type") || !data.hasOwnProperty("data")) return;

                switch (data.type){
                    case 'private_message':
                        addChatItem(data.data.name + '(悄悄的...)',data.data.message)
                        break;
                    case 'message':
                        addChatItem(data.data.name,data.data.message)
                        break;
                    case 'msg':
                        alert(data.data.msg)
                        break;
                }

            }catch (ex) {

            }
        };

    });

    $("#setName").click(function () {
        var name = $('input[name=name]').val().trim();
        if (name==''){
            alert('昵称不能为空');
            return;
        }
        sendData('setName',{name:name});
    });

    $("#send").click(function () {
        var message = $('input[name=message]').val().trim();
        if (message==''){
            alert('内容不能为空');
            return;
        }

        if(message.indexOf(":") >= 0){
            sendData('private_message',{message:message});
        }else{
            sendData('message',{message:message});
        }

    })

    function addChatItem( name,message ) {
        var temp = '</p>
<p>
</p>
<div class="box"><p>
</p>
<p>__NAME__ 说:</p>
<p>
</p>
<p>__CONTENT__</p>
<p>
</div>
<p>
</p>
<p>';
        temp = temp.replace( "__NAME__",name );
        temp = temp.replace( "__CONTENT__",message );
        $("#content").append(temp);
    }

    function sendData(type,data) {
        if(ws.readyState != 1){
            alert(connected ? "连接已中断" : "连接不成功");
            return;
        }
        ws.send(JSON.stringify({type:type,data:data}));
    }
</script>
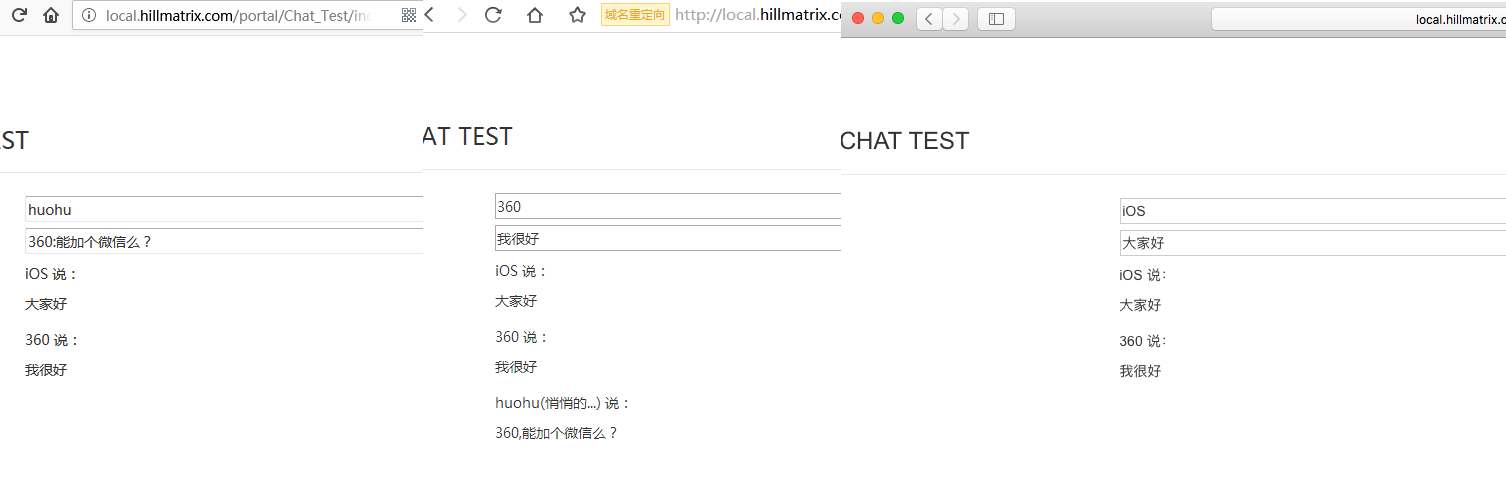
6、测试效果

参考代码:https://gitee.com/goto8848/build_a_simple_chat_room_with_workerman

官方文档:http://doc.workerman.net/faq/send-data-to-client.html

thinkphp5.1 + workerman 留着以后参考:https://blog.csdn.net/qq_27238185/article/details/81477303

PDF文档数字签名

fpdf官网:http://www.fpdf.org/?lang=zh

tcpdf官网:https://tcpdf.org/

1、对证书签名与验签逻辑优化,在linux系统中生成根证书CA,用CA为子证书签名,最后使用子证书为pdf做签名,防止pdf伪造自签证书。

1
2
3
4
5
6
7
8
#1、生成根证书 #a).生成根证书私钥(key文件)
openssl genrsa -aes256 -out ca.key 2048

#b).生成根证书签发申请文件(csr文件)
openssl req -new -key ca.key -out ca.csr -config /usr/lib/ssl/openssl.cnf

#c).自签发根证书(crt文件)
openssl x509 -req -days 3650 -sha1 -extensions v3_ca -signkey ca.key -in ca.csr -out ca.crt
1
2
3
4
5
6
7
8
9
10
11
#2、用根证书签发server端证书
#a).生成根证书私钥(key文件)
openssl genrsa -aes256 -out tcpdf.key 2048

#b).生成根证书签发申请文件(csr文件)
openssl req -new -key tcpdf.key -out tcpdf.csr -config /usr/lib/ssl/openssl.cnf

#c).使用根证书签发服务端证书
openssl ca -in tcpdf.csr -out tcpdf.crt -days 730 -cert ca.crt -keyfile ca.key -config /usr/lib/ssl/openssl.cnf

#The organizationName field needed to be the same in the CA certificate (Timeswealth Global Root CA)

若发生错误: I am unable to access the ./demoCA/newcerts directory ./demoCA/newcerts: No such file or directory

做如下处理

1
2
3
4
5
mkdir demoCA
mkdir demoCA/newcerts
mkdir demoCA/private
touch demoCA/index.txt
echo "01" &gt;&gt; demoCA/serial

备注:一下是tcpdf官方提供的生成自签名证书方法,测试用,如果用于实际会有逻辑漏洞,没有根证书约束。

1
2
3
4
5
6
7
8
9
10
11
/* NOTES:

- To create self-signed signature: openssl req -x509 -nodes -days 365000 -newkey rsa:1024 -keyout tcpdf.crt -out tcpdf.crt

- To export crt to p12: openssl pkcs12 -export -in tcpdf.crt -out tcpdf.p12

- To export p12 to pfx: openssl pkcs12 -export -inkey tcpdf.crt -in tcpdf.crt -out tcpdf.pfx

- To convert pfx certificate to pem: openssl pkcs12 -in tcpdf.pfx -out tcpdf.crt -nodes

*/

自己封装的tcpdf操作类

1
2
3
4
5
6
7
8
9
10
11
12
13
14
15
16
17
18
19
20
21
22
23
24
25
26
27
28
29
30
31
32
33
34
35
36
37
38
39
40
41
42
43
44
45
46
47
48
49
50
51
52
53
54
55
56
57
58
59
60
61
62
63
64
65
66
67
68
69
70
71
72
73
74
75
76
77
78
79
80
81
82
83
84
85
86
87
88
89
90
91
92
93
94
95
96
97
98
99
100
101
102
103
104
105
106
107
108
109
110
111
112
113
114
115
116
117
118
119
120
121
122
123
124
125
126
127
128
129
130
131
132
133
134
135
136
137
138
139
140
141
142
143
144
145
146
147
148
149
150
151
152
153
154
155
156
157
158
159
160
161
162
163
164
165
166
167
168
169
170
171
172
173
174
175
176
177
178
179
180
181
182
183
184
185
186
187
188
189
190
191
192
193
194
195
196
197
<pre>&lt;?php
require_once __DIR__."/tcpdf/tcpdf.php";

class TcpdfProxy
{
    //tcpdf对象
    private $pdf = null;
    //证书路径及密码
    private $_certificate = array(
        'signing_cert'          =&gt;  '',
        'private_key'           =&gt;  '',
        'private_key_password'  =&gt;  'tcpdfpass',
    );

    private $_signConf = array(
        'image'             =&gt;  '',
        'image_position'    =&gt;  array(
            'x' =&gt;  80,
            'y' =&gt;  25,
            'w' =&gt;  50,
            'h' =&gt;  50,
        ),
        'sign_info'         =&gt;  array(
            'Name'      =&gt; 'tcpdf',
            'Location'  =&gt; 'location',
            'Reason'    =&gt; 'Digital signature of PDF file',
            //'ContactInfo' =&gt; SITE_DOMAIN,
        ),

    );

    /***********  自签名证书配置  ***************/
    private $prikeyPass     =   '123456789';
    private $numberOfDays   =   '730';
    private $cerPath        =   "";
    private $cerConfig      =   array(
                                    "digest_alg"        =&gt; "sha256",
                                    "private_key_bits"  =&gt; 1024,                    //字节数    512 1024  2048   4096 等
                                    "private_key_type"  =&gt; OPENSSL_KEYTYPE_RSA,     //加密类型
                                    //"config"          =&gt; "/etc/ssl/openssl.cnf"
                                );
    private $dn             = array(
                                    "countryName"               =&gt; "CN",                            //所在国家
                                    "stateOrProvinceName"       =&gt; "LiaoNing",                      //所在省份
                                    "localityName"              =&gt; "FuShun",                        //所在城市
                                    "organizationName"          =&gt; "Richter59 Global Root CA",    //注册人姓名
                                    "organizationalUnitName"    =&gt; "www.richter59.cn",            //组织名称
                                    "commonName"                =&gt; "www.richter59.cn",            //公共名称
                                    "emailAddress"              =&gt; "postmaster@richter59.cn"      //邮箱
                                );
    /************  自签名证书配置END  **************/


    public function __construct()
    {
        $this-&gt;pdf = new TCPDF(PDF_PAGE_ORIENTATION, PDF_UNIT, PDF_PAGE_FORMAT, true, 'UTF-8', false);

        $this-&gt;setConfig();

        $this-&gt;cerPath = $_SERVER["DOCUMENT_ROOT"]."/public/";

        $this-&gt;_certificate['signing_cert'] = 'file://'.$this-&gt;cerPath.'tcpdf.crt';
        $this-&gt;_certificate['private_key']  = 'file://'.$this-&gt;cerPath.'tcpdf.crt';
    }

    private function setConfig()
    {
        //页面头部横线取消
        $this-&gt;pdf-&gt;setPrintHeader(false);
        //页面底部更显取消
        //$pdf-&gt;setPrintFooter(false);
        //自动分页
        $this-&gt;pdf-&gt;SetAutoPageBreak(TRUE, PDF_MARGIN_BOTTOM);
        //设置页面margin
        $this-&gt;pdf-&gt;SetMargins(PDF_MARGIN_LEFT, 15, PDF_MARGIN_RIGHT);
        //设置页码
        $this-&gt;pdf-&gt;setFooterFont(Array(PDF_FONT_NAME_DATA, '', PDF_FONT_SIZE_DATA));
        $this-&gt;pdf-&gt;SetFooterMargin(PDF_MARGIN_FOOTER);
        //设置字体,注意在循环里面一定要把new都一起放在循环里面,不然会报错,没有设置字体,因为这个需要上下文来读取配置
        $this-&gt;pdf-&gt;SetFont('stsongstdlight', '', 12);
    }

    public function setSignConf(array $conf){
        $this-&gt;_signConf['image'] = $conf['image'] ?: '';
        isset($conf['image_position']['x']) ? $this-&gt;_signConf['image_position']['x'] = $conf['image_position']['x'] : '';
        isset($conf['image_position']['y']) ? $this-&gt;_signConf['image_position']['y'] = $conf['image_position']['y'] : '';
        isset($conf['image_position']['w']) ? $this-&gt;_signConf['image_position']['w'] = $conf['image_position']['w'] : '';
        isset($conf['image_position']['h']) ? $this-&gt;_signConf['image_position']['h'] = $conf['image_position']['h'] : '';

        if(isset($conf['Name']) &amp;&amp; !empty($conf['Name'])){
            $this-&gt;_signConf['sign_info']['Name'] = $conf['sign_info']['Name'];
        }
        if(isset($conf['Location']) &amp;&amp; !empty($conf['Location'])){
            $this-&gt;_signConf['sign_info']['Location'] = $conf['sign_info']['Location'];
        }
        if(isset($conf['Reason']) &amp;&amp; !empty($conf['Reason'])){
            $this-&gt;_signConf['sign_info']['Reason'] = $conf['sign_info']['Reason'];
        }
        if(isset($conf['ContactInfo']) &amp;&amp; !empty($conf['ContactInfo'])){
            $this-&gt;_signConf['ContactInfo']['Name'] = $conf['sign_info']['ContactInfo'];
        }
    }

    private function signatureWithPdf($img,array $signInfo){
        // set certificate file
        if($this-&gt;_certificate){
            $certificate = $this-&gt;_certificate;
        }else{
            $certificate = $this-&gt;getCrtFile();
        }

        if($certificate){
            // set additional information
            if(!empty($signInfo)){
                isset($signInfo['Name']) &amp;&amp; !empty($signInfo['Name']) ? $this-&gt;sign_info['Name']=$signInfo['Name'] : "";
                isset($signInfo['Location']) &amp;&amp; !empty($signInfo['Location']) ? $this-&gt;sign_info['Location']=$signInfo['Location'] : "";
                isset($signInfo['Reason']) &amp;&amp; !empty($signInfo['Reason']) ? $this-&gt;sign_info['Reason']=$signInfo['Reason'] : "";
                isset($signInfo['ContactInfo']) &amp;&amp; !empty($signInfo['ContactInfo']) ? $this-&gt;sign_info['ContactInfo']=$signInfo['ContactInfo'] : "";
            }

            // set document signature
            $this-&gt;pdf-&gt;setSignature($certificate['signing_cert'], $certificate['private_key'], $certificate['private_key_password'], '', 1, $this-&gt;sign_info);

            // reset pointer to the last page
            //$pdf-&gt;lastPage();
            $this-&gt;pdf-&gt;setPage(1);

            // *** set signature appearance ***
            $x = $this-&gt;_signConf['image_position']['x'];
            $y = $this-&gt;_signConf['image_position']['y'];
            $w = $this-&gt;_signConf['image_position']['w'];
            $h = $this-&gt;_signConf['image_position']['h'];

            // create content for signature (image and/or text)
            $this-&gt;pdf-&gt;Image($img, $x, $y, $w, $h);

            // define active area for signature appearance
            $this-&gt;pdf-&gt;setSignatureAppearance($x, $y, $w, $h);

            // *** set an empty signature appearance ***
            //$this-&gt;pdf-&gt;addEmptySignatureAppearance(180, 80, 15, 15);
        }

    }

    public function outputPdf($html,$fileName)
    {

        $this-&gt;pdf-&gt;AddPage();

        // output the HTML content
        $this-&gt;pdf-&gt;writeHTML($html, true, false, true, false, '');

        if($this-&gt;_signConf['image'] != '' &amp;&amp; file_exists($this-&gt;_signConf['image'])){
            $this-&gt;signatureWithPdf($this-&gt;_signConf['image'],$this-&gt;_signConf['sign_info']);
        }

        //Close and output PDF document
        $this-&gt;pdf-&gt;Output($fileName, 'I');
    }

    //本地生成.cer自签名证书文件
    public function getCrtFile()
    {
        $prikeyPass     = $this-&gt;prikeyPass;    //私钥密码
        $numberOfDays   = $this-&gt;numberOfDays;  //有效时长
        $cerPath        = $this-&gt;cerPath.md5($prikeyPass.$numberOfDays.'cer').".cer"; //生成证书路径
        //$pfxpath = APP_ROOT_PATH."public/".md5($prikeyPass.$numberOfDays.'pfx').".pfx"; //密钥文件路径

        if(!file_exists($cerPath)){
            $config = $this-&gt;cerConfig;

            $dn = $this-&gt;dn;

            //生成证书文件
            $priKey = openssl_pkey_new($config);
            $csr = openssl_csr_new($dn, $priKey,$config);
            $x509 = openssl_csr_sign($csr, null, $priKey, $numberOfDays);

            openssl_x509_export($x509,$cerStr);
            openssl_pkey_export($priKey, $pkStr);

            $data = $cerStr.$pkStr;

            $writeResult = file_put_contents($cerPath,$data);

            if($writeResult === false){
                throw new Exception("证书或签名生成失败!");
            }
        }
        $data = array();
        $data['signing_cert']   = 'file://'.realpath($cerPath);
        $data['private_key']    = 'file://'.realpath($cerPath);
        $data['private_key_password'] = $prikeyPass;
        return $data;
    }
}</pre>

操作类的使用

1
2
3
4
5
6
7
8
9
10
11
12
13
14
15
16
17
<pre>require_once APP_ROOT_PATH."/system/utils/tcpdf_proxy.php";

$tcpdf = new TcpdfProxy();

$html = '&lt;html&gt;content&lt;/html&gt;';

$singConf = array();

$singConf['image'] = APP_ROOT_PATH.app_conf('CONTRACT_SEAL');

$singConf['sign_info'] = array(
    'Name' =&gt; app_conf('SHOP_TITLE'),
);

$tcpdf-&gt;setSignConf($singConf);

$tcpdf-&gt;outputPdf($html,'contract.pdf');</pre>

Git服务器搭建与客户端简单操作

服务器端准备工作:

1. 安装git

1
apt-get install git

2. 为了安全,新建一个专门用于代码部署的无特权用户

1
2
3
useradd -m git
#设置该用户的密码
passwd git

3. 新建一个目录作为要部署代码的根目录,如:

1
mkdir /var/www/git/item.git

4. 将这个目录的属主和属组都改为上面新建的用户git

1
2
cd /var/www/git
chown git:git item.git

5. 切换到部署代码的专用用户

1
su git

6. 进入项目根目录,初始化为git仓库

1
2
cd item.git
git init Initialized empty Git repository in /var/www/git/item.git/.git/

7. 必要的配置

1
2
3
4
5
6
7
8
#让仓库接受代码提交
git config receive.denyCurrentBranch ignore

#可选
git config core.worktree ~/www

#可选,禁止强制推送
git config --bool receive.denyNonFastForwards false

注意!

我们可以在自己的服务器上创建git仓库,有两种方式:

git –bare init (裸仓库)

git init

两者区别:

1,普通git仓库的目录结构就和你的代码目录结构一致,只多了.git目录,.git目录中包含了git的一些配置等数据

2,裸仓库只保存了一些配置信息等,肉眼是找不到我们所上传的代码的

额外说明:用”git init”初始化的版本库用户也可以在该目录下执行所有git方面的操作。但别的用户在将更新push上来的时候容易出现冲突。比如有用户在该目录(就称为远端仓库)下执行git操作,且有两个分支(master 和 b1),当前在master分支下。另一个用户想把自己在本地仓库(就称为本地仓库)的master分支的更新提交到远端仓库的master分支,他就想当然的敲了git push origin master:master于是乎出现错误 ,因为远端仓库的用户正在master的分支上操作,而你又要把更新提交到这个master分支上,当然就出错了。

确定一个repository是否为bare库的关键在于core.bare属性(boolean型属性)。core.bare属性可以有git config命令设置,也可以通过修改config文件的方式设置,conf文件指的就是当前库下面的conf配置文件,如果这里 bare = true 那么即使有.git文件夹也还是不能进行相关操作。 如果使用了git init初始化,则远程仓库的目录下,也包含work tree,当本地仓库向远程仓库push时, 如果远程仓库正在push的分支上(如果当时不在push的分支,就没有问题), 那么push后的结果不会反应在work tree上, 也即在远程仓库的目录下对应的文件还是之前的内容,必须得使用git reset –hard才能看到push后的内容.

本地仓库准备工作:

1. 通过 git clone 或 git pull 从仓库上将代码获取到本地

1
2
3
4
Administrator@PC-20170526BRPS MINGW32 /d/www/gitgit clone git@t.024ea.com:/var/www/git/item.git

Cloning into 'item'...
git@t.024ea.com's password: warning: You appear to have cloned an empty repository.

接下来接个phpstrom编辑更改代码提交,就简单了。

git利用post-receive自动化部署:

1. 更新服务端 git 仓库状态并检出文件

1
2
3
4
5
6
7
8
9
10
11
12
13
14
cd /var/www/git/item.git
git update-server-info
git checkout -f

# OR:

# 如果push的不是master分支
# git checkout branch_name

ls
new.html
cat new.html
#已经能看到提交文件
hello new git!

2.设置服务器钩子

1
2
3
4
5
6
#仓库配置文件
cd /var/www/git/item.git/.git/hooks

#默认没有这文件,新建了一个
touch post_receive
vim post_receive

shell脚本

1
2
3
4
5
6
7
8
9
10
#!/bin/sh
chown www-data /var/www/git/item.git -R
DEPLOY_PATH=/var/www/git/item.git

unset  GIT_DIR #这条命令很重要
cd $DEPLOY_PATH
git reset --hard
git pull
chown www-data -R $DEPLOY_PATH
chgrp www-data -R $DEPLOY_PATH

关于unset GIT_DIR的说明:

经过查找资料,如过没有unset命令,在文件中添加 git pull 时会报错,提示:”fatal: Not a git repository: ‘.'”。hook脚本执行了cd之后,继续执行git语句拉取的时候还是在hooks文件夹下,而不是cd的文件路径。git的hooks里面默认有一些环境变量,会导致无论在哪个语句之后执行git命令都会有一个默认的环境路径,既然这样unset 掉默认的GIT环境变量就可以了。

参考:http://alfred-long.iteye.com/blog/1836347

补充

关于本地第一次使用clone命令无法使用git用户登陆,需要先使用命令ssh-keygen,参考:

1
2
3
4
5
6
7
8
9
10
11
12
13
14
15
16
17
18
19
20
21
root@office-host-ubuntu:/var/www/git# ssh-keygen
Generating public/private rsa key pair.
Enter file in which to save the key (/root/.ssh/id_rsa)/home/git/.ssh/id_rsa
Enter passphrase (empty for no passphrase):
Enter same passphrase again:
Your identification has been saved in /home/git/.ssh/id_rsa.
Your public key has been saved in /home/git/.ssh/id_rsa.pub.
The key fingerprint is:
SHA256:eXBtsym+2BZfcbWIk3E7Xh6doWn7q1lzMotX1zXxsbY
root@office-host-ubuntu The key's randomart image is:
+---[RSA 2048]----+
|                 |
|           o . +.|
|        . . O = @|
|         + = @.O=|
|        S o * *o*|
|         o.. o.E+|
|          .o .++o|
|         o....+=o|
|        ..o .+o..|
+----[SHA256]-----+

ubuntu + phpStorm + Xdebug安装及调试设置

1、下载Xdebug

点击下载

2、安装

1、接下源码
1
tar zxvf xdebug.tar.gz
2、编译源码
1
2
3
4
5
cd xdebug
/usr/local/php/bin/phpize
./configure --enable-xdebug --with-php-config=/usr/local/php/bin/php-config
make
make install

安装完成后会出现:

1
2
3
4
5
6
7
8
9
10
11
12
13
14
15
16
17
18
19
20
21
22
Installing shared extensions:     /usr/local/php/lib/php/extensions/no-debug-non-zts-20160303/
+----------------------------------------------------------------------------------------------------+
|
| INSTALLATION INSTRUCTIONS
| =========================
|
| See http://xdebug.org/install.php#configure-php for instructions
| on how to enable Xdebug for PHP.
|
| Documentation is available online as well:
| - A list of all settings: http://xdebug.org/docs-settings.php
| - A list of all functions: http://xdebug.org/docs-functions.php
| - Profiling instructions: http://xdebug.org/docs-profiling2.php
| - Remote debugging: http://xdebug.org/docs-debugger.php
|
|
| NOTE: Please disregard the message
| You should add "extension=xdebug.so" to php.ini
| that is emitted by the PECL installer. This does not work for
| Xdebug.
|
+----------------------------------------------------------------------------------------------------+
3、修改配置文件
1
2
3
4
5
6
7
8
9
10
11
12
13
14
15
16
17
18
sudo vim php.ini
#加一下内容
[Xdebug]
zend_extension=/usr/local/php5.6/lib/php/extensions/no-debug-non-zts-20131226/xdebug.so
xdebug.idekey = PHPSTORM
xdebug.auto_trace = on
xdebug.default_enable = on
xdebug.auto_profile = on
xdebug.collect_params = on
xdebug.collect_return = on
xdebug.profiler_enable = on
xdebug.remote_enable = 1
xdebug.remote_host = 192.168.1.225
xdebug.remote_port = 9059
xdebug.remote_handler = dbgp
xdebug.remote_connect_back = 1
xdebug.trace_output_dir = "/usr/local/php/xdebug/"
xdebug.profiler_output_dir = "/usr/local/php/xdebug/"

重启lnmp后通过php -v应该可以看到

1
2
3
4
5
PHP 5.4.45 (cli) (built: Jan 19 2018 10:30:47)
Copyright (c) 1997-2014 The PHP Group
Zend Engine v2.4.0, Copyright (c) 1998-2014 Zend Technologies
with Xdebug v2.4.1, Copyright (c) 2002-2016, by Derick Rethans
with Zend Guard Loader v3.3, Copyright (c) 1998-2013, by Zend Technologies

4、安装火狐xdebug插件

下载插件地址

安装完毕之后, 打开该插件的options, 设置IDEKey为PhpStorm.

需要和phpstorm中设置的ide key 保持一致

5、phpstorm的设置

6、开始进行断点测试,断点测试前,可以进行xdebug的验证是否配置成功

第一个地址栏填写你的项目的地址

第二个地址栏填写你访问的地址

点击validate开始验证,若有错误,根据提示修改配置。

7、点击phpstorm小电话图标,开始监听,设置断点并并调试。

原理示意图(从xdebug的官网上引用的)